Strawberry Cucumber Salad with Lime Dill Vinaigrette

Strawberry salad with cucumbers kohlrabi and lime dill vinaigrette

Last week at the farmer’s market next to my office building, I found my first local strawberries of the season.  Oh, how I’ve impatiently waited for this day.  I loooove strawberries.  I can eat a full litre basket of them in one day.  But the strawberries that are worthy of gluttony are local ones.

Local strawberries are so different from the berries available the rest of the year at the grocery store (imported from Florida and California) as to seem to be an almost entirely different fruit.

Grocery store berries are varieties that travel well.  They aren’t necessarily fully ripe when picked, but they hold their shape well and they have a relatively long shelf life (for berries).  Flavour isn’t the major factor when choosing varieties of strawberries that will face long distance travel.

The varieties of strawberries that are grown locally, and sold locally, are all about the flavour.  They are usually a smaller berry.  What these berries lack in size they make up for in flavour.  These berries are  sweet and juicy.  They can easily be damaged when packed into containers, and because they are fully ripe when picked, they will spoil relatively quickly.  I’m not usually too worried about spoiled berries, as I tend to eat them very quickly.

I was eager to go to the farmer’s market on my lunch break on Thursday, as I was certain there would be some strawberries.  I was not disappointed.  Two vendors had some.  Score!  I bought a basket from each.  I had big plans for the berries.

local strawberries

In addition to the strawberries, there were other great finds at the market.  Aren’t the baby beets and kohlrabi cute?

fresh local vegetables, cucumbers, kohlrabi, baby beets and spring mix

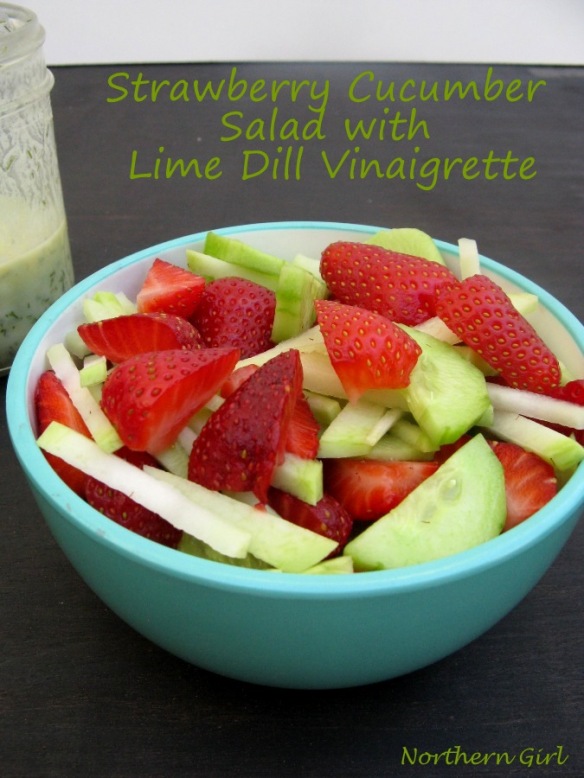
Equipped with the strawberries and fresh vegetables, once home I put together this strawberry cucumber salad.  This salad has no leafy greens in it.  It’s still a salad though.  I’ve been enjoying lots of leafy green salads this spring, but thought it was the time to branch out.

In order to give the salad a bit of crunch, I added some kohlrabi.  If you don’t have kohlrabi, you could use carrots, celery or sweet peppers.  Or you could add some seeds such as pumpkin or sunflower.

One of the great things about salad is that it doesn’t need to follow a set formula.  You can throw in what seems appealing or what you have on hand.  No two salads are ever exactly alike, which is great, as it keeps things exciting.

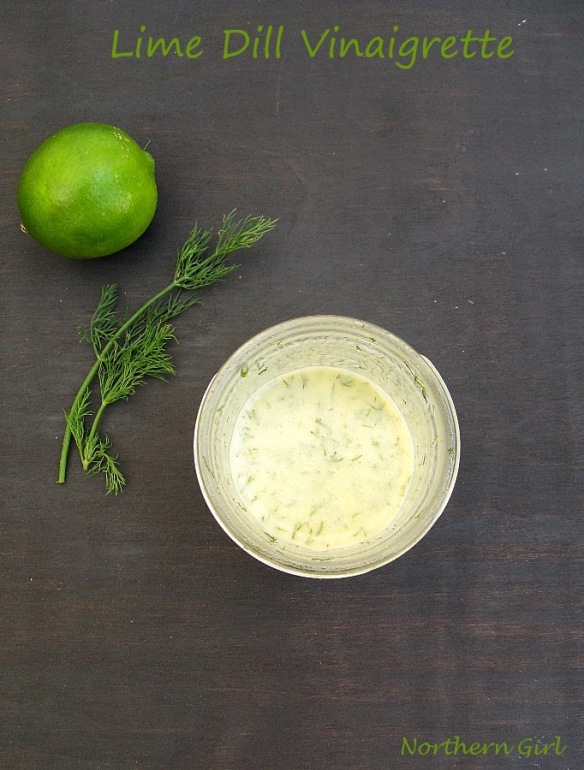
One thing I have learnt about creating a good salad.  The choice of vinaigrette has a big impact on the final result.  I was quite selective when choosing vinaigrette for this salad.  I used dill in the vinaigrette as dill goes very well with cucumbers, and with strawberries.  I like citrus in my vinaigrette, and the citrus of the moment is lime.  The tartness of the lime is a good counterpoint to the sweetness of the berries.

strawberry and cucumber salad with lime and dill vinaigrette

You may be familiar with the current trend of mason jar salads.  You may even love mason jar salads.  I don’t.  I don’t like the idea of packing my salad so tightly into such a small space.  I also don’t want my dressing in my salad hours, or even days, before I eat it.  And the final nail in the coffin for me is that mason jars are just too darn heavy!  I take the bus to work, and I don’t need the extra weight of the glass jar when the bus is full and I have to stand the whole way home.  Give me these lightweight containers that have lots of space and keep the dressing nicely segregated from the salad until I am ready to eat it any day.

vinaigrette lime dill

All that said mason jars do have a role to play in salads.  But for the vinaigrette.  A small mason jar is the perfect vessel for making the vinaigrette and storing it.  Place or pour all your ingredients directly into the jar, put on the lid and shake the jar.  Voilà, a jar of vinaigrette.  If you have more vinaigrette than you will use during that one meal, simply put the lid back on and put it in the fridge.  You now have vinaigrette to use over the course of the upcoming week.


Recipe:  Lime Dill Vinaigrette

Makes about 1/3 cup (85 mL)

recipe for lime dill vinaigrette


Ingredients:

  • Juice of one lime (about 1 ½ tablespoons, 22 mL)
  • 1 tablespoon finely chopped fresh dill
  • 3 tablespoons (45 mL) plain yogurt
  • 1 tablespoon maple syrup
  • Salt, to taste

Directions:

  1. Place all the ingredients into small mason jar (250 mL), place lid on jar and shake until well mixed.
  2. Store leftover vinaigrette in fridge for up to about one week.


Recipe:  Strawberry Cucumber Salad

lime dill vinaigrette with strawberry cucumber salad

Ingredients:

  • Strawberries, washed, hulled and chopped into quarters
  • Cucumber, peeled and sliced
  • Kohlrabi, peeled and chopped into matchsticks

Directions:

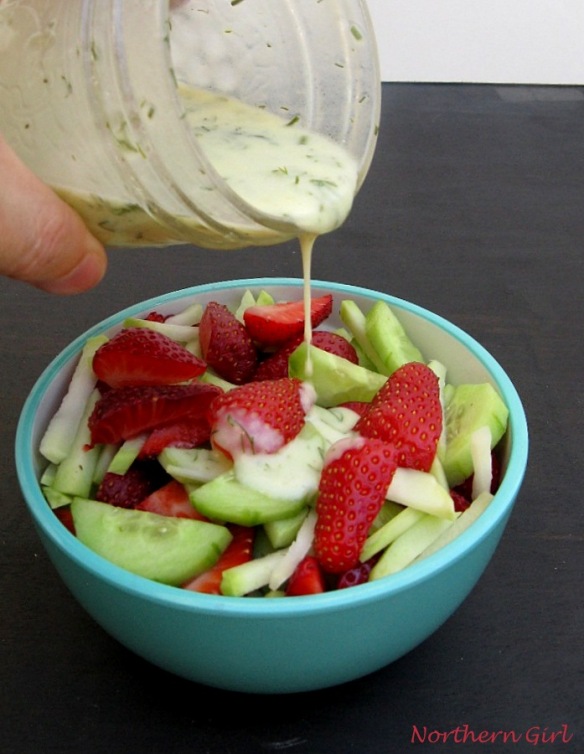
  1. Place all ingredients in large bowl and pour lime dill vinaigrette over it.

How to Make Tender Flavourful Ribs

Recipe for Tender Tasty Ribs

So you want to discover how to transform ribs like these ⇓ into tasty, tender ribs like these ⇑?

Back Ribs

Follow these four easy steps and you too will make tender ribs that have great flavour.  You can choose back ribs or side ribs, depending on what you prefer.


A: Flavour Part 1, The Rub

The first step in giving your ribs great flavour is to coat them in a great tasting rub.  I use a brown sugar rub (you can find the recipe here) which my family loves, but if you have a favorite rub for pork, you can use that.

When coating the ribs with rub, start with the underside, then do the ends, and finish with the top side.  You want a thick, even coating on the entire slab.

pork rub coating all sides of the slab of ribs


B: The Cooking Technique, in this case, Braising

Ribs have a lot of connective tissue, and to make them tender it is best to cook them at a low heat for a long time, often called low and slow cook.

Braising means cooking in a covered pot in a shallow layer of liquid.  To braise it, the meat isn’t completely covered with liquid, which would boil or stew it.  Instead, the meat is only partially submerged, and then simmered at low temperature until it becomes tender.

Braising ribs in the oven in a sealed foil packet makes them tender

One of the great things about braising is that it’s a hands-off cooking technique.  The oven does all the work for you.  It just requires patience to transform potentially tough cuts of meat into tender goodness.


C: Flavour Part 2, Enhance the Braising Liquid

While plain water, broth or even apple juice can be used as the braising liquid, I like to take the opportunity to add even more flavour to my ribs.  To make my braising liquid, I add garlic, balsamic vinegar, maple syrup, and Dijon mustard to the water.

After the ribs are cooked, you can use the braising liquid as the base for a sauce for the ribs if you want.  You cook the liquid on the stove-top until it thickens.


D: Finger Licking Good, The BBQ Sauce

We prefer saucy ribs, so once the ribs are cooked and tender, the final step is to add our favorite bbq sauce and place ribs in the oven on broil for 3 minutes.  What comes out of the oven are tender ribs with lots of flavour and dripping in sauce.  Just the way we like them.

Tasty tender ribs dripping in bbq sauce


So it’s as simple as that:

A + B + C + D = flavourful, tender ribs that will have your family asking for more.


I used back ribs for my recipe.  Side ribs (also called spare ribs) can also be cooked using the same technique.  You would simply increase the cooking time for side ribs.  For two pounds of side ribs, increase the cook time given in the recipe below (which is for back ribs) by about 30 minutes.


Recipe:  Tender Pork Ribs

Braising ribs makes them tender

Ingredients:

  • 2 lbs (1 kg) pork back ribs
  • 4 to 5 tablespoons dry rub (recipe here)
  • ¾ cup (185 mL) water
  • 2 large cloves garlic, chopped
  • 3 tablespoons (45 mL) balsamic vinegar
  • 1 tablespoon (15 mL) maple syrup
  • 2 tablespoons (30 mL) Dijon mustard
  • ¼ cup (60 mL) your favorite bbq sauce (we like Sweet Baby Ray’s Hickory & Brown Sugar)

Directions:

  1. Place ribs on a plate. Coat all sides of pork ribs evenly with dry rub.  Cover with plastic wrap and refrigerate for 2 to 24 hours.
  2. Take ribs out of fridge. Pre-heat oven to 250 F.
  3. Make your braising liquid. In medium bowl, add water, garlic, balsamic vinegar, maple syrup and Dijon mustard and whisk until well blended.
  4. Place a large piece of heavy duty aluminium foil (one large enough to make a sealed packet for the ribs) on a cookie sheet. Fold the large piece of foil in half.  Place the ribs in between the top and bottom layer of foil.  Tightly fold up one of the short sides of the foil as well as the long side.  Leave one of the short sides open.
  5. Pour braising liquid into the foil packet, and tightly fold up the last side, creating a sealed packet.
  6. Place ribs in oven and cook for 2 to 2.5 hours. When they are cooked, you will be able to use a fork to cut through the meat.
  7. Take ribs out of oven and turn oven to broil.
  8. Remove ribs from foil packet (be careful when opening, as the steam will be very hot) and transfer them to a parchment paper lined cookie sheet.
  9. Brush bbq sauce generously over the ribs. Place ribs in oven and broil for 3 minutes, letting the bbq caramelize just a bit.
  10. Remove from oven and serve.


Recipe Notes:  I use pasture raised pork, which tends to have somewhat shorter cooking times than conventionally raised pork.  My pasture raised pork back ribs cook in 2 hours.  If using conventionally raised pork, your cook time will likely be closer to 2.5 hours.

Brown Sugar Pork Rub Recipe

recipe for pork rub with brown sugar paprika and chili powder

Have you discovered rubs yet? Although I’ve been marinating meat for years, rubs are something I really discovered last year.  I started buying my pork and my beef directly from local farmers, and as a result I have been exposed to many new-to-me cuts of meat.  Some of those cuts require a slow cook at low temperatures and rubs are more effective than marinades for that.

A rub is a way to infuse a lot of flavour into your meat. By coating your meat in the rub and letting it sit in the refrigerator for several hours (anywhere from 2 to 24 hours), the flavour is able to penetrate beyond just the surface.

Ribs coated with brown sugar pork rub

One key ingredient in any rub is salt. The salt helps to draw the flavours into the meat.  I use coarse salt.  If you use table salt, reduce to about ¾ teaspoon.  The grains are smaller, so volume isn’t the same between different types of salt.

When using a rub, make sure that you coat every surface of your cut of meat, including any ends. I usually start with the bottom side of the meat, then any ends, and finally spread the rub on the top.  The moisture of the meat will help the rub stick to it and melt in a little as the meat sits in the fridge.

pork rub coating all sides of the slab of ribs

When I developed this pork rub recipe, I was looking for bold flavour, without too much heat, as my family doesn’t like very spicy food. This rub has some brown sugar to provide a bit of sweetness.  It also includes some chili powder, for just a bit of heat, but not very much.  It’s really a very family friendly pork rub recipe.

This brown sugar pork rub is very flavourful and is great on various cuts of pork, from ribs to chops to roasts. It’s been a big hit with my family.  They rave about it every time I make it.

I have ribs in the oven right now, coated in this rub to give them great flavour. Today I am sharing the recipe for the brown sugar pork rub.  Later this week I’ll share the technique for making these tender, oh so flavourful ribs.

Braised ribs brown sugar pork rub plus barbecue sauce


Recipe: Brown Sugar Pork Rub

This makes enough for about 2 pounds (1 kg) of ribs or chops, or a 3 pound (1.4 kg) roast.

recipe for brown sugar rub for pork

Ingredients:

  • 2 tablespoons packed brown sugar
  • 1 ½ tablespoon paprika
  • ¾ tablespoon chili powder
  • 1 teaspoon garlic powder
  • 1 teaspoon coarse salt
  • ½ teaspoon black pepper

Directions:

  1. Add all ingredients to small bowl and mix thoroughly.
  2. Place pork on a plate. Coat all sides of the pork with the rub, cover with plastic wrap and refrigerate for 2 to 24 hours.
  3. Cook pork according to your recipe.

Best Ways to Store Your Vegetables and Waste Less

How to store vegetables to keep them fresh longer

We’ve been talking a lot about food waste lately, which costs Canadian households an average of $1,500 each year.   We’ve also discussed ways to reduce food waste, particularly from produce.

Do you know that one thing that can significantly impact the shelf life of vegetables is how you store them?   Keeping your vegetables fresh for longer can save you money, as you will be throwing less of them away.

Follow these tips when putting your vegetables away and you may be pleasantly surprised by how long they will last, so that you can eat them, instead of feeding them to the compost or garbage.


Get to Know Your Refrigerator

Cold air is heavier than warmer air, and sinks. This means the bottom of the fridge is the coldest area.  The bottom shelf is a great place for things that really need to stay cold, like meat and dairy.  It’s not a good spot for delicate items like berries and lettuce.

The warmest part of the fridge is the door area, as it is quickly exposed to room temperature air every time someone opens the fridge. Given that, although many fridges have a compartment for eggs in the door, that is not a good place to store them.  They should be kept on a shelf in the main part of the fridge.

An important thing to understand is the humidity settings on your crisper drawers. Crisper drawers usually have a small lever that regulates the openings of the vents at the top of the drawer.

  • High humidity: A more humid environment is great for vegetables that wilt like lettuce, spinach, and celery. Use the lever to close the vents. In many fridges, there will be an image of vegetables, or “more humid” symbols for that setting.
  • Low humidity: Some fruit, such as apples and bananas, give off ethylene gas, which speeds up the ripening process. If those are left in a drawer with closed vents, the contents will ripen so quickly that the contents of the drawer may rot. It is desirable to have open vents for fruits and vegetables that rot rather than wilt. The drawer will often have a fruit or “less humid” symbol for that setting.


How to Store Vegetables

Anything that has an elastic or tie wrap

Fresh vegetables

Many herbs and vegetables, from green onions to cilantro to carrots, have some type of tie wrap or elastic around them. When you get these items home, remove the wraps and elastics.  While convenient for keeping bunches together, those wraps place extra pressure on delicate parts and cause bruising to leaves and stems.  This bruised spot is often the first place a vegetable or herb will start to turn slimy or rot.  Getting rid of wraps and elastics takes only a few moments, but can add days to the life of the item.


Mixed salad greens

Mixed salad greens from the farmer’s market or in a CSA box often come in zip closure bags. There is often a lot of moisture in the bag, especially if the greens are washed. Remove the greens from the plastic bag and use a clean tea towel to pat dry as much as possible.  The excess water is your enemy here, as it will cause the greens to wilt and rot quickly.

I get the best results by placing the greens in a clamshell container (the kind mixed greens come in at the grocery store). I line the bottom of the clamshell with paper towel, add some greens, place another paper towel layer in the middle and add the rest of the greens.  One more paper towel goes on the top.  The paper towel will absorb some of the excess water.  The closed container can be placed in the open shelf section of the fridge.  Replace the paper towels after a few days if you still have greens.

If you don’t have clamshells, the method I have found with the second best result is to use a large size zip top bag with short slits cut into the bottom and sides of the bag. The slits let excess moisture escape.  Place a paper towel layer between the greens and the bag, again, to absorb water, and place the bag paper towel side down in the fridge.


Head lettuce and cooking greens

Swiss Chard

Head lettuces and cooking greens such as kale, chard and beet greens should also be protected from excess moisture. Choose a plastic bag that is large enough to cover the greens, all the way to the tip. I like to use thin plastic produce bags.  If the ends of the bunch of greens are exposed directly to the cold air in the fridge, they tend to wilt, so cover them well.   Place a layer of paper towel between the greens and the bag to absorb excess moisture.  Place the paper towel side down.  Replace with fresh paper towel after a few days.

If you can fit the head lettuce in the crisper drawer, do so. The cooking greens are usually too long to fit my crisper drawers, so they go in the main part of the fridge.  Try to avoid the bottom shelf if you can, as the bottom is the coldest part of the fridge.


Spinach

How to store spinach

The best way to store your spinach depends on the form of spinach you have.

If your spinach comes in a bunch, treat it like a bouquet of flowers. Wash and pat dry your spinach.  If it has roots, keep them.  Add about an inch of water to a jar.  Place the spinach in the jar, with the roots or bottom of the stems in the water, and the leaves above the jar.  Place a bag loosely over the top of the spinach, and place on shelf in fridge.  This will create an environment with enough moisture to keep the spinach fresh, while also keeping the leaves dry enough to not turn slimy.

If your spinach is loose spinach, store in the same way you would mixed salad greens, with a paper towel in a plastic clamshell container or in a vented plastic bag.


Vegetables with greens still attached

Radishes with greens still attached

Root vegetables from the farmer’s market, and sometimes those from the grocery store, often have the greens still attached. Consider these to be a bonus, as most vegetable greens are edible, so you have a 2-in-1 deal here.

To keep your vegetables as great tasting as possible, remove the greens when you first bring them home, before they even go in the fridge. The green tops continue to draw moisture and sugars from the root vegetable, so if left on, you won’t get maximum flavour.

Break the greens off, remove any tie wrap, and store the greens in a plastic bag, like other cooking greens. Better yet, prepare the greens on the same day.  The greens from radishes, carrots, and beets are all edible, but they are highly perishable.  They should be eaten within two days.


Cilantro and other delicate herbs

How to store cilantro to keep it fresh for weeks

Cilantro takes a bit of extra effort up front, but once done, you will have fresh, clean cilantro that should last several weeks in your fridge.

When you first get home, thoroughly wash and pat dry your cilantro. If the roots are still present, keep them.  They will help keep your cilantro fresh even longer.  Find a container that is tall enough to accommodate the cilantro if it is upright and that has a lid.  Add about 1” of water to container, place cilantro in container keeping the leaves above the water, and put lid on container.  Place the container in the fridge. Change the water every couple of days, and pick out any pieces of cilantro that are starting to yellow.  The cilantro should stay fresh for about three to four weeks.  The bonus?  It’s already washed, so when you need cilantro, take it out of the container and you are ready to go.


Asparagus

How to keep asparagus fresh

Use a tall container to keep asparagus upright. It does not need a lid.  Add about one inch of water to container.  Change water every day or two.  Your asparagus can remain fresh for almost a week this way, but you will probably want to eat it within the first few days.


Potatoes, onions and garlic

Best storage for each of these is similar, but they should not be stored together. Place them in a dark, cool, dry cupboard or a dark, cool spot in the basement if you have one.  They should not go in the fridge.  Do not store them in plastic bags.  Potatoes can be placed in a paper bag that has some ventilation, but avoid exposing them to light.  Light will cause potatoes to sprout and turn soft.  Onions and garlic can be loose in a cupboard that has reasonable air flow.  Keep them away for sources of heat like the oven or the dishwasher.  If they are in the same cupboard, store the onions and garlic on different shelves.

Avoid using closed plastic onion or garlic keepers. The lack of air flow and moisture that is created will cause the onions and garlic to sprout.


Tomatoes

tomatoes

Keep tomatoes in a bowl on the counter or the kitchen table unless your home is very hot. Note that storing them at room temperature means they will continue to ripen, so use them soon after buying.  Storing tomatoes in the cool refrigerator will cause them to become mealy.


Do you use any of these methods when storing your produce? Do you have other storage methods that work well?  Please share with us in the comments.


Mexican Inspired Black Bean and Corn Salad

Mexican Inspired Black Bean and Corn Salad with Cilantro and Lime Vinaigrette

Inspiration for meals can come from many different places. This black bean and corn salad was inspired by the bunch of beautiful cilantro that came in my first vegetable CSA (community supported agriculture) box this season.

Fresh cilantro, also known as coriander

Cilantro is often used in Mexican food. So is corn.  I have some sweet, incredibly tasty corn in my freezer from a local farm.  The corn was processed at the farm right after it was picked last summer and it tastes just like corn on the cob at the peak of the season.  I knew I had to use it for this dish.

I chose black beans and bell peppers to round out the salad. For the vinaigrette, I chose limes.  Limes, cilantro and corn.  You can’t go wrong with that combination.  And so this Mexican inspired black bean and corn salad was born.

During the summer, I love serving salads as a meal. On a hot day, I don’t want to slave over a hot stove or turn on the oven.  Salads are a great alternative.  There is no need to be limited to leafy green salads, as this black bean and corn salad shows. It’s packed with protein and fibre, so makes for a satisfying meal.  I served mine in tortilla bowls, making it really feel like a meal.  Alternately, you could forego the tortilla bowls and serve it as a side to accompany grilled meat or tacos.

I highly recommend squeezing your own fresh lime juice for this vinaigrette.  I always keep a few limes in the fridge, because fresh lime juice has such a nice flavour compared to bottled.

A quick tip to get the most juice out of your citrus fruit, in this case, the limes.  Take your limes out of fridge a few hours before you need them (you can even take them out in the morning before going to work) to let them get to room temperature.  Before cutting limes to juice them, roll them between your palm and the counter, gently pushing down.  This technique will produce much more juice than if you use cold limes.


Recipe: Mexican Inspired Black Bean and Corn Salad

Black Bean and Corn Salad inspired by the flavours of Mexico

Lime Vinaigrette

Ingredients:

  • ¼ cup (60 mL) lime juice (from 2 to 3 large limes)
  • ¼ teaspoon ground cumin
  • 1/8 teaspoon paprika
  • 1/8 teaspoon chili powder
  • 1/2 teaspoon dried oregano
  • ¼ teaspoon salt
  • 1/3 cup (80 mL) extra virgin olive oil

Directions:

  1. Squeeze lime juice into medium size bowl, removing any seeds. Add cumin, paprika, chili powder and salt. Whisk.
  2. While still whisking, gradually pour in olive oil and whisk until well blended.


Black Bean & Corn Salad

Ingredients:

  • 1 ½ cup corn kernels
  • 1 can (19 oz, 540 mL) black beans, no salt added
  • 1 red bell pepper, diced small
  • 1 orange bell pepper, diced small
  • 4 green onions (scallions) white and green parts, finely chopped
  • 2 cups packed cilantro leaves and stems, finely chopped
  • Lime vinaigrette
  • Tortilla bowls, optional

Directions:

  1. If using frozen corn, add ½ cup water to small pot. Add corn and bring water to a boil. Boil for 4 minutes. Remove from heat, drain and let corn cool to room temperature.
  2. In large bowl, add black beans, peppers, onions, cilantro and corn. Mix all ingredients together.
  3. Stir lime vinaigrette and pour into salad bowl. Toss until all ingredients evenly coated.
  4. Refrigerate 1 to 2 hours before serving, so that ingredients absorb flavour of vinaigrette.
  5. If serving as a main dish, serve salad in tortilla bowls.


Get the Most Out of Your CSA Share: How to Waste Less Food and Save Money

Reducing Food Waste Means Saving Money Find Out How To Waste Less Food

Have you signed up for a vegetable community supported agriculture (CSA) share this year? Are you a bit worried about how you will eat through your share without wasting a lot of it?  As CSA season is just getting started, I thought it would be a great time to share some of the tips and tricks that help me keep produce waste to a minimum, which means saving money.

As I shared with you last week, food waste is significant in North American households. Several years ago, I realized my family was wasting a lot of food.  I decided we had to do better.  Then, three years ago, I signed up for a vegetable CSA share.  The CSA share meant that I would no longer be the one selecting our vegetables, or even the quantity of vegetables.  I was getting what was in season.  The farmer, and Mother Nature, was deciding for me.   At that point, I knew I really had to implement a strong strategy to minimize our food waste.

Reducing food waste is good for the planet, and good for the wallet.

Produce waste can be a problem, regardless of where you buy it (a CSA share, the grocery store or the farmer’s market). Having a CSA share can pose some particular challenges, as you don’t have control over what or how much you buy.  This strategy can help.

Make the most of your CSA vegetable share. Learn how to waste less food.

My first vegetable CSA box of the 2016 season.

When you pick up your vegetable share:

  • Ask about any unfamiliar items – The person giving you your share should be able to identify any new to you vegetables, and let you know the best way to prepare them.


  • Note what you can’t / won’t eat – There may be some items that your family doesn’t like or can’t eat. In this case, if you can’t leave it at your pickup location, make arrangements to donate the unwanted items to family, friends, or neighbours. They will likely be happy to receive these farm fresh offerings.


When you first get home with your vegetables:

  • Inventory what you have – Knowing what you have will help you meal plan for the week.


  • Post list on the fridge—You’ve taken inventory of what you have, now place the list in a prominent place where you will see it. I keep a whiteboard on my fridge. I list my vegetables on it as well as the meat in my freezer, and erase items as I use them up. This way, I can easily see what I have at all times. It has eliminated that moment of discovering an item that made its way to the back of the fridge only to be found weeks later. It also helps me decide what to make for dinner and I don’t even have to open the fridge or freezer door to hunt to see if I have a particular item.


  • Clean and put away – A bit of extra time spend at this stage can greatly extend the shelf life of your produce. Clean the excess dirt from root vegetables before putting them away. Dirt can harbour bacteria that will accelerate decomposition. Select the best storage method for each item. I shared some of these with you here.


Over the week/2 weeks between vegetable pickups:

  • Make a meal plan – A meal plan helps you map out how you will use all the fresh produce you have on hand that week. Try planning your meals around the vegetables. Yes, I said the vegetables. I know this may seem radical for North American meat centered meals, but this way, you actively think about using your vegetables, as opposed to having them be an afterthought. I find that by looking at my inventory of vegetables I see patterns of what I want to use together, and it helps to me plan my meals. For example, if I have broccoli, carrots and peppers, I might plan for a stir fry, while tomatoes, hot peppers and onions might mean some pasta sauce.


  • Eat the most perishable first – Some vegetables have a short shelf life. Eat those first. Making a meal plan can help you with this. I often use the most perishable item on the day I bring my vegetables home. On vegetable pickup day, I’m usually prepared for the possibility that I might need to grill highly perishable items like eggplant and summer squash, or I might make a salad with the various fresh greens.
    • Highly perishable, eat within a few days: eggplant, berries, corn as it turns starchy, tomatoes if very ripe, radish greens, summer squash, mixed salad greens, spinach, asparagus, peas, and surprisingly, broccoli
    • Moderately sturdy, eat within 5 to 6 days: cauliflower, head lettuce, cooking greens like kale and chard, peppers, cucumbers, beans, tomatoes if firm, rhubarb
    • Store well, eat at your leisure: onions, carrots, potatoes, beets, cabbage, radishes, leeks, kohlrabi, Brussel sprouts, winter squash


  • Eat the whole vegetable – This is one many of us can improve as we tend to discard many parts of the vegetable. In reality, many of those parts make good eating. Most green tops, for example, are edible. You can eat beet greens, radish tops and even carrot tops. But these are very perishable, so you want to do that within the first couple of days. Also, the skin on many veggies is edible. Think carrots, potatoes and even baby beets. When you get your vegetables fresh from a local farm, the skin on them in quite nice and delicate. No need to peel them. Just scrub well before preparing.


  • Freeze the extra – There may be items you are unable to eat that week. Before they spoil, freeze them. Many vegetables can be frozen, not just the obvious like beans, peas and corn.
    • Tomatoes: Yes, you can freeze tomatoes. Wash and dry the tomatoes, then place them whole in freezer bags. The texture will change due to freezing, but they are great to use in any way you would canned tomatoes – chili, tomato soup, pasta sauce. Think of how much you will enjoy using locally grown, vine-ripened tomatoes in the winter.
    • Onions: Onions are often much larger than what is needed for a recipe. Dice the entire onion, use what you need in the recipe, and freeze the rest in one cup portions. Like tomatoes, due to high water content, freezing will change the texture, so use them in dishes where they are cooked, like soups and sauces.


  • Google is your friend – Have a vegetable that you aren’t sure how to prepare? Don’t know what to do with that overabundance of cucumbers because you can only eat so many salads? Google. You will find something new.


Love Food Hate Waste

This strategy has helped my family to significantly reduce food waste. It has helped us win in many ways:

  • I feel better about wasting fewer resources;
  • My family is eating more vegetables on a daily basis;
  • We save money by planning our meals and eliminating the need to replace vegetables that have gone bad; and
  • I can happily say, my days of finding gross things in the fridge are over.


Do you have any tips for getting the most out of your CSA share? Please share in the comments.

Quick & Easy Grilled Potatoes

Quick & Easy Grilled Potatoes - potatoes on the barbecue

I don’t know what the weather is like where you are, but here, it is unseasonably hot! I am not complaining, as I love sunshine and heat.  But the extreme heat does mean I am doing lots of cooking outdoors.  Yep, I’m looking at you barbecue.  Grilling is my cooking method of choice right now.

Grilling is probably my favorite way to cook. Not only is it a great way to keep the house cool, there are no pots and pans to wash after the meal.  Add the fact that grilled food tastes great, and it’s a win-win-win (grin).

When grilling, you aren’t limited to just meat. Potatoes and vegetables prepared on the barbecue are also wonderful, and quick to prepare.

Quick? Potatoes on the barbecue are quick?  Yes, I hear your disbelief.  If you are wondering how potatoes done on the barbecue are quick, it’s probably because you are preparing them the way I did in the past.  Whole potatoes wrapped in foil.  It’s true; those types of potatoes don’t cook quickly.  Not even when you start them in the microwave first. But I promise you, yes, grilled potatoes can be done quickly.

The trick to quick and easy grilled potatoes is to slice them before putting them on the grill. This way, lots more surface area gets heated, and the cooking time is dramatically reduced.

I started grilling my potatoes this way last year, and I won’t go back. Not only do they cook quickly, but these potatoes have so much more flavour than the wrapped in foil style ones.  I wish I had figured this out years ago. No more need to start the potatoes super early.  This way, the potatoes grill in about the same amount of time as any meat you might also be grilling.

The microwave is still your friend here. I give my potatoes a head start in the microwave.  They get a few minutes on medium high, I let them cool for several minutes (to avoid burnt fingers) and then cut them into ½” thick slices.  Brush a little oil on both sides of the potato slices, add some salt, other seasoning like Italian seasoning, and then cook them on low heat directly on the grill for about 5 minutes per side.  The results are potatoes that are fully cooked, with nice grill marks, and flavour like a cross between a roasted, baked and twice baked potato.

Quick Easy Grilled Potatoes with Sour Cream and Chives

You can top these anyway you like. We are partial to sour cream and chives, but grated cheese is very tasty too.  Or you can leave them naked.  They are great that way too.

What is your favorite thing to grill?

Recipe: Quick and Easy Grilled Potatoes

Easy Grilled Potatoes Quick to prepare on barbecue


Ingredients:

  • Medium size potatoes, 1 per person
  • 2 teaspoons canola oil
  • ½ teaspoon dried Italian seasoning
  • 1/8 teaspoon salt
  • 1 tablespoon sour cream per potato (optional)
  • 2 sprigs fresh chives, finely chopped (optional)

Directions:

  1. Pre-heat gas barbecue.
  2. Wash and scrub potatoes, keeping skin on, but removing any eyes or other blemishes.
  3. Use a fork to poke holes all around potato. The holes will allow moisture to escape potatoes while in microwave.
  4. Microwave potatoes on medium-high for about 3 minutes (could be longer if you have lots of potatoes.
  5. Let potatoes cool for 5 to 10 minutes, and then cut into ½” thick slices.
  6. In a medium size bowl, add canola oil, Italian seasoning and salt. Add potato slices and mix well to coat potatoes evenly.
  7. Reduce heat for burners you are using to low, and place potatoes in single layer directly on grill. Cook about five minutes per side.
  8. Remove from grill and serve. Top with sour cream and chives before serving if desired.


Households Waste $1500 of Food Each Year

How Much Does Food Waste Cost You Each Year?

Food waste. It’s something I’ve thought about more and more in the past several years.  It slowly started to dawn on me that I was throwing out a lot of food, especially fresh (or not so fresh anymore) produce.  And that all the produce that was going into the garbage (more recently the green bin for composing) was costing me money.

When I thought about it some more, I realized that resources were being wasted too.

  • The water used to grow the crops.
  • The fertilizers and pesticides applied on the fields to grow the food I wasn’t eating.
  • The fuel used in the machinery to harvest the food.
  • The materials used to produce the packaging for the food, and the energy to power the plant that makes the packaging.
  • The gas in the trucks that transports the food from Southern Ontario, or California, or Mexico, to my grocery store in Ottawa.

Once I really thought about it, the waste was so much bigger than the uneaten or spoiled food that was going into the garbage.

Scary, right? But do you know the scariest part?  I am not alone.  I am, in fact, perfectly ordinary.  According to the Food and Agriculture Organization of the United Nations (FAO), North American consumers waste an average of 115kg (253lbs) of food each year.  That’s per person!  That’s just the food that we bring home from the store.

The price tag attached to this food waste? In Canada, it’s $1,500 per household each year.   Think of the vacation your family could enjoy with that money.  Or the day camps for your kids.  Or how much faster you could pay off your student loan…

In Canada, this consumer food waste accounts for almost half of all food wasted.  Half!  And it adds up.  To $14.6 billion annually wasted by consumers in Canada alone.

But food waste isn’t limited to the consumer.

Sources of Food Waste in Canada

Farms account for 10% of the waste, most of it from fruits and vegetables. This can be due to:

  • rejecting produce that isn’t “pretty” enough for consumers;
  • fruits and vegetables that are the wrong size (too big or too small for that basket of peaches, too long for the bunch of carrots, etc.);
  • produce that is too ripe to be transported across the country; and
  • produce being trimmed to fit the bag (think outer stems of celery stalks, outer leaves of heads of romaine to make romaine hearts).

Food wastes is costly to us all. It adds about 10% to your grocery bill.

If we stopped throwing out food, the average Canadian household would save $1,500 per year. If food waste in all the stages from farm to retail were eliminated, we would spend about 10% less buying it in the first place.

Love Food Hate Waste
The cost of food waste extends beyond our pocketbooks. It takes a toll on the environment too.  Resources such as water go in to growing food that ultimately doesn’t get eaten.  Globally, the amount of water used to produce food that doesn’t get eaten is equal to the amount of water flow of the Volga River, the largest river in Europe.

And where does the food we toss out end up? Most of it ends up in landfills, where it breaks down and emits greenhouse gasses such as carbon dioxide and methane.  So much food ends up in landfills that this is a major source of methane production worldwide.  With all the concerns about greenhouse gas emissions, isn’t it crazy that we could all help reduce them simply by wasting less food?

The fact that almost half of food waste occurs at the consumer level is actually good news. It means you have the power to reduce food waste. You don’t have to wait for businesses or government to act.  You can waste less food.  You control what you buy and what you throw away.  You can save $1,500 per year for your family, and help the environment at the same time.  Now that’s a win-win.

Next week I’ll share some tips on how you can reduce your food waste (and save money).


Carrot Spice Muffin Recipe

Carrot Spice Muffins - nut free, egg free recipe

I love carrot muffins, but for some reason had never made any of my own.  I think some of my hesitation may have been due to a reluctance to grate “a whole pile” of carrots, which is what I thought it took to make carrot muffins.  I was wrong about that. It only takes a few carrots.  I regularly grate carrots for salads, so I know grating carrots is really no big deal.

Last month I was out and had a spice cake for dessert.  Well, that was it.  That cake lit a fire under me.  I had to figure out how to make carrot muffins that would create the comforting sensation I had while eating that cake.

It’s taken a number of tries to get these carrot spice muffins just right.  We’ve eaten a lot of carrot muffins around here the past six weeks or so. They were all good.  But I kept adjusting, because they weren’t quite right.

But this recipe?  It’s the one.  It’s just what I wanted my carrot spice muffins to be.  These muffins are light, yet satisfying, moist and full of rich, warm spice flavour.  These muffins are worth the effort I’ve put in to getting the recipe right.

Recipe Carrot Spice Muffins

As you read through the recipe, you will see that it requires both ground and fresh ginger.  No, it’s not a typo.  In the many trials for this recipe, I went back and forth between fresh and ground ginger, and the muffins were always missing something.  That is, until I decided to use both forms of ginger in the same batch.  That was the missing piece of the puzzle.  Using both forms of ginger hits just the note of spice I wanted.

This carrot spice muffin recipe is both egg free and nut free.


Recipe: Carrot Spice Muffins

Makes 12 muffins

Carrot Spice Muffins

Ingredients:

  • 2 cups whole wheat flour
  • 2 teaspoons baking powder
  • ½ teaspoon baking soda
  • ½ teaspoon salt
  • 2 teaspoon ground cinnamon
  • 1 teaspoon ground ginger
  • ¾ teaspoon ground nutmeg
  • ¾ teaspoon ground cloves
  • 2/3 cup (165 mL) milk
  • ½ cup (125 mL) pure maple syrup (see recipe notes)
  • ¼ cup (60 mL) canola oil
  • 1 teaspoon (5 mL) vanilla extract
  • ¼ cup (60 mL) plain yogurt
  • Zest of one large orange
  • Juice from one large orange (about ¼ cup, 60 mL)
  • 1 tablespoon fresh ginger, minced
  • 2 cups grated carrots (about 3 or 4 large carrots)


Directions:  

  1. Preheat over to 375 F (190 C).  Grease muffin pan or line with paper liners.
  2. In large bowl, mix together whole wheat flour, baking powder, baking powder, salt, cinnamon, ground ginger, nutmeg and cloves.
  3. In a medium bowl, whisk together milk, maple syrup, canola oil, vanilla, yogurt, orange zest, orange juice and ginger until well blended.
  4. Pour wet ingredients over dry ingredients and add grated carrots.  Stir just until moistened. Over stirring the batter will make the muffins tough.
  5. Spoon batter into muffin tins.  Bake for 20 to 23 minutes, or until tops of muffins spring back when lightly pressed with finger.
  6. Let cool in muffin tin for 5 minutes, then transfer to wire rack to cool completely.


Recipe Notes:

Use pure maple syrup, not maple flavoured table (pancake) syrup.  If you don’t have maple syrup, you can substitute with honey.

Fettuccine in Creamy Tomato Sauce with Kale and Bacon

I love pasta.  Pasta dinners have been a staple in my house most of my life.  Lately, I’ve found myself in a pasta rut.  I always find myself making one of two tomato based pasta sauces.  I love both sauces, but sometimes I want to change things up.

I wanted to find a way to include more vegetables in my pasta dishes.  But I didn’t want to abandon tomatoes altogether, as I regularly have access to fresh, vine-ripened, locally grown tomatoes.  The solution was simple, really.  Creamy tomato sauce.

Creamy tomato sauce is actually quite easy to make.  You start by building a regular tomato sauce, and then add cream and Parmesan cheese at the end.  These two ingredients totally transform a simple tomato sauce into something smooth and creamy, but not too rich.

Kale is still abundant at the grocery stores and at the farmer’s markets which have just opened up again for the new season.  It seemed like the obvious vegetable to use.  And if I was going to use kale, then of course I needed to also include kale’s favorite buddy, bacon.  Bacon and kale are fantastic partners.  They should be used together as often as possible.

Pasta in Creamy Tomato Sauce with Kale and Bacon

I used half and half cream, which is 10% cream.  You can use a heavier cream if that’s what you have.  It will make your sauce a bit richer than mine.

The brown sugar mellows out the acidity of the tomatoes.  It gives the sauce a smoother finish.  If you like the acidic bite of tomatoes, or are trying to avoid added sugar, you can omit it.

This fettuccine in creamy tomato sauce was a big hit at my house.  Plus, it’s easy to make.  Creamy tomato sauce has been added to my pasta rotation and will grace our dinner table often.

Kale and Bacon Fettuccine in Creamy Tomato Sauce


Recipe:  Fettuccine in Creamy Tomato Sauce with Kale and Bacon

Recipe adapted from Julia’s Album

Makes 4 servings

Easy Pasta Dinner Fettuccine in creamy tomato sauce with kale and bacon

Ingredients:

  • 10oz (280g) fettuccine noodles
  • 6 slices bacon
  • 1 medium onion, small dice
  • 4 cloves garlic, minced
  • 4 medium size fresh red tomatoes, small dice
  • ¾ teaspoon salt
  • 2 teaspoons dried Italian seasoning
  • ½ teaspoon paprika
  • 1 tablespoon brown sugar
  • 1 bunch kale (about 10oz or 280g), washed, stems removed and sliced into thin ribbons
  • 1 cup (250 mL) half and half (10% cream)
  • ½ cup (125 mL) grated Parmesan cheese

Directions:

  1. In large pot, bring water to a boil and cook fettuccine according to package directions.
  2. In large pan, on medium-high heat, cook bacon until crisp. Depending on the size of your pan, you may need to cook bacon in two batches.  Keep bacon drippings in pan, but transfer cooked bacon to a plate, break into large pieces and reserve for later.
  3. In pan with bacon drippings, on medium heat, add onions and sauté for 3 to 4 minutes, until onion start to soften. Add garlic to pan and cook one minute more, until garlic fragrant.
  4. Add chopped tomatoes to pan. The liquid from the tomatoes will deglaze the pan. Scrape up the browned bits into the tomato mixture as they will add flavour to the sauce.  Add salt, Italian seasoning, paprika and brown sugar.  Stir well.
  5. Add kale to pan. Stir until kale wilts, about 3 to 5 minutes. Cover pan and simmer for 10 to 12 minutes, stirring occasionally, until tomatoes and kale cooked.
  6. Add half and half cream to pan and bring to a boil. Add Parmesan cheese.  Reduce to a simmer and stir, about 1 to 2 minutes, until cheese melted.  Remove from heat.  Add ¾ of bacon pieces to sauce.
  7. Add cooked fettuccine noodles to sauce and toss until well coated.
  8. Serve pasta on individual plates, and garnish with reserved bacon and extra Parmesan cheese if desired.